1. WP Guppy - A live chat plugin compatible with workreap
2. Hide menu item from left or top user dashboard menu
3. How to change site icon
4. How milestone jobs works
5. How to change "from email name" in WordPress
6. How to Update Theme, When New Update release
7. Developer Guide
8. WordPress 5.8 widgets area issue
9. How to hire a freelancer and complete the project
10. How to start a conversation in workreap
11. How to create users from backend
12. How to set commission in Workreap
13. How to use elementor page builder in workreap theme
14. Page Speed
15. Users Verification Process
16. Why there is no ongoing service or project on hiring
17. How to change currency and formatting
18. How to setup CRON job for payouts and notifications
19. How to translate or rename strings in theme and plugins
20. Google Map API KEY
21. How to delete or remove report freelancers, jobs, employers and services from
22. Social Connect[ Facebook, LinkedIn and Google ] Settings
23. How to complete a job
24. How to Install Workreap WordPress Theme
25. How to create Mega Menu in Workreap
26. Server Requirements
27. How to extend Elementor shortcode
28. Funds Withdraw Request
29. How to add Post a Job or Post a Service link in Main Menu
30. How to extend plugin functionality in theme
31. Import demo pages separately
32. How to change placeholder images
33. How to remove Native APP Link
34. What is the difference in project expiry and project deadline date
35. Hiring Settings
36. How to create a login page in workreap
37. Unyson plugin issue with WordPress 5.5, and how to resolve
38. Geo location not working
39. How to override shortcodes of workreap theme in elementor in child theme
40. Preview Images Are Not Included in Theme Package!
41. How Payouts Works
42. How to change Currency
43. What is profile health and how it does work in workreap
44. How to translate "Home" word in breadcrumbs
45. Why WooCommerce doesn't update package or hiring statuses once used PayPal
46. How to enable real-time chat
47. Front-end Dashboard Access
48. How offline payments would works
49. How to change title bar banners
50. Why freelancers not showing
51. How to setup page templates
52. How to change dashboard icon images
53. How to setup trial packages
54. Why email took time to arrive or not working
55. How to enable or disable switch user in workreap
56. How do credits of freelancers work
57. How to hide search results for visitors and show a banner
58. "Help & Support" works in workreap?
59. Demo Content Import issue with LiteSpeed webservers
60. How admin can enable either jobs posting or service posting or both
61. System Access Type Either Free or Paid users
62. How to use AtomChat into Workreap Theme
63. How to change slug for custom post types
64. How to verify freelancers identity documents
65. How to hide menu items from both left and top menu
66. How to create a messenger page with WP Guppy
67. Server requirements
68. How to hide departments from the registration page
69. How to translate WP Guppy
70. How to install Workreap REST API Plugin
71. Dashboard Access
72. ModSecurity and Theme Settings saving trigger 403 Errors
73. Workreap: Services search layout
74. How to enable social media account
75. Why email took time to arrive or not working
76. Assign menu location
77. How to Update Theme, When New Update release
78. Hourly rate settings for freelancers
79. How to add login or registration button into elementor menu
80. Start chatting with a specific user on the messenger page
81. How to enable send service quote and how it works
82. How to import the users from back-end by using excel file
83. How to change dashboard icon images
84. Why there is no ongoing service or project on hiring
85. Why WooCommerce doesn't update package or bookings once PayPal is used
86. Why some WooCommerce payment gateway doesn't complete the booking or hiring process
87. How to change currency and formatting
88. How to enable real time chat experience with WP Guppy
89. How to setup MailChimp for the newsletters in one of the footer
1. WP Guppy - A live chat plugin compatible with workreap
WP Guppy - A live chat plugin compatible with workreap
Workreap theme is compatible with WP Guppy - A live chat plugin compatible with workreap. Please make sure if you are using latest version of theme and plugins 2.3.4
You must buy this plugin and install this. After the installations go to
Admin can select users roles to show the users on the front-end. Like You can show only employers to the freelancers or freelancers to show employers
Admin can also hide users listing tab from the Settings page
If still you see any issue, please create a support ticket and we will be happy to assist you
2. Hide menu item from left or top user dashboard menu
Hide menu item from left or top user dashboard menu
In the latest release 2.3.4 we have added the options to hide the top and left menus. By default, we hide some menus from the left and show them in the top menus. Same for the top menu.
You can go to Theme Settings > Directory Settings and remove the default and it will show all the menu items in both menus
3. How to change site icon
You can change the site Icon from WordPress settings
Appearance > Customize > Site Identity
4. How milestone jobs works
How milestone jobs works
During the job posting employer can select options either this Project is milestone based or normal
If employer have selected milestone based, then after create employer can see it in jobs listing. Now employer can click on button View Proposal
It will open a page where he/she can see all the proposals
Employer can select one of freelancer and click on Hire And Set milestones
It will open a new window where admin can create milestones within the Proposed Amount
When all the Milestones would be created then employer will see a button Send Milestones to Freelancer
Then freelancer will get and email, if he accepted then project will be start. Now employer will be able start and pay one by one milestone.
Once all milestones would be completed then Employer would be able to Complete the project.
Please download the latest version of the theme package from themeforest.net
Please go to your download section at themeforest and then download theme files :
And then you need to make sure that:
-- You have taken a complete backup of your theme and plugin(workreap_core) files. This is important because just in case you have made any mistakes or had made any changes in the theme or plugin, you can recover those from your backup.
-- Once the backup has been taken, you can either delete the theme and plugin and upload a newer one or replace files by using FileZilla or another file transfer protocol.
Please note: Don't import users or demo content. It will override and delete your database contents. You just need to replace/delete files.
Thanks!
7. Developer Guide
Developer Guide
Filters to add or remove items from dropdown
There are no options to include new fields in the below mentioned fields from Theme Settings, however you can use filter in child theme to include new items in these fields.
- Project Type [Filter] : workreap_filters_job_type
This will required changes at code level to add or delete items from them. We have used filter to add or remove settings
For example if you would like to add or remove items in project level then below filter can be used to override in child theme functions.php
Projects Type
if (!function_exists('workreap_filters_job_type')) { add_filter('workreap_filters_job_type', 'workreap_filters_job_type', 1); function workreap_filters_job_type($list){ //fw_print($list); //display all list unset( $list['fixed'] ); //remove
$list['new_item'] = esc_html__('New Job Type','workreap-child'); //add new
return $list; } }
same for above other filters
Remove Payouts methods( PayPal or Bank Transfer )
add_filter('workreap_filter_payouts_lists','workreap_filter_payouts_lists',10,1); function workreap_filter_payouts_lists($list){ unset($list['paypal']); //unset($list['bacs']); return $list; }
add_filter('workreap_filter_payouts_lists','workreap_filter_payouts_lists'); function workreap_filter_payouts_lists($list){ unset($list['bacs']); //remove Bank Transfer( key : bacs ) or PayPal( key : paypal ) return $list; }
Change Hourly Rate Filter
add_filter('worktic_set_hourly_rate_list','worktic_set_hourly_rate_list'); function worktic_set_hourly_rate_list($list){ unset($list['0-5']); //remove first item $list['0-7'] = esc_html__('$5 And Below', 'workreap'); //add new item return $list; }
Reset/Edit/Remove/Add User Menu through child theme
In WordPress 5.8 widget area of Unyson has been deprecated, if you would use the Unyson plugin sidebar then please try to install and activate the Classic Widget plugin https://wordpress.org/plugins/classic-widgets/
9. How to hire a freelancer and complete the project
How to hire a freelancer and complete the project
10. How to start a conversation in workreap
How to start a conversation in workreap
Only employers can start the conversation from the freelancer detail page by clicking the button "Send offer"
and then they can go to inbox and check the ongoing chats
11. How to create users from backend
To create users from back-end.
Admin > Users > Add New User
When you will select role Employer or Freelancer then it will create a profile in the back-end As well.
12. How to set commission in Workreap
How to set commission in Workreap
There are 3 types of commission in the workreap
Fixed
Percentage
Tiers
Now in the tiers, the admin can set fixed or percentage depends upon the project cost.
1) This can be done from Theme Settings > Payment Settings
2) You can also set the same commission settings for the individual projects
We have commissions settings for both types of users, let 10% commission
If enabled for freelancer then if the job is $100 then freelancer will get $90 and admin will get $10
If enabled for employers too then if the job is $100 then the employer will pay $100 + $10 = $110 and the freelancer will get $90. So admin will get $20 from both users
WooCommerce Taxes
You may also use the WooCommerce taxes for both type of users. Like you can add tax while hiring a freelancer to employers
13. How to use elementor page builder in workreap theme
You can check this video guide how to use elementor page builder for the pages
14. Page Speed
Speed depends upon many things like your server speed, items being loaded on the page, images, and third-party scripts. To increase page speed you can use any cache plugins
Admin can enable either user should be verified by email or by admin. If the admin set it to by email then users will get an email with a verification link and they can verify them
If set as admin approval then the admin will get an email to verify users manually
Verify users(freelancers and employers ) before publicly available. Note: If you select "Need to verify, after registration" then the user will not be shown in the search result until the user will be verified by site owner. If you select "Verify by email" then users will get an email for verification. After clicking link user will be verified and available at the website.
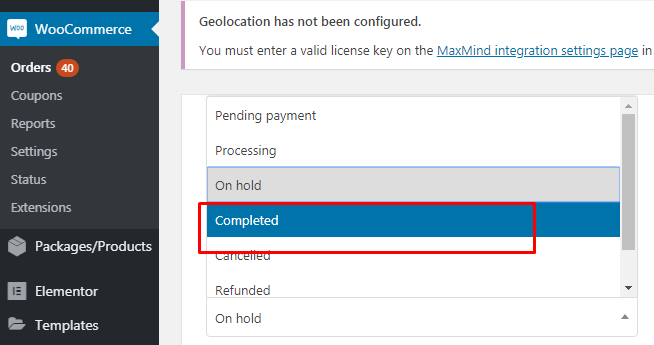
16. Why there is no ongoing service or project on hiring
Why there is no ongoing service or project on hiring
We have used WooCommerce for the packages and hiring process and have used below the hook
woocommerce_payment_complete
Once any payment arrived successfully then above WooCommerce hook trigger to and move job or service to ongoing status. If any payment gateway failed to run below WooCommerce order function on payment success then it will not move job or service to ongoing
$order->payment_complete()
Most payment methods use the above function to process the order.
Any gateways that default to On Hold or Pending Payment instead of Processing will not process the order against packages update or hiring.
Like any offline payment gateway like COD, Check Payment or Bank transfer will not move order to ongoing and when admin will complete the order from back-end then it will move to ongoing and freelancer balance will be updated
To make sure of this, you can try to use Stripe Credit card payments plugin, which sends the status processing and all the functions of our theme seem to be working fine.
17. How to change currency and formatting
How to change currency
Admin can change the currency from WooCommerce settings page
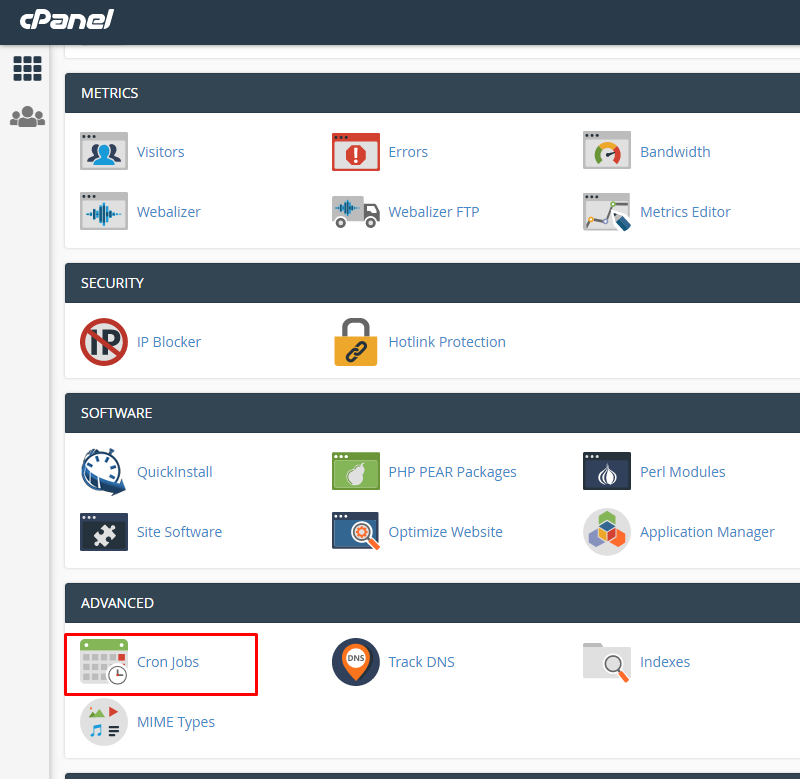
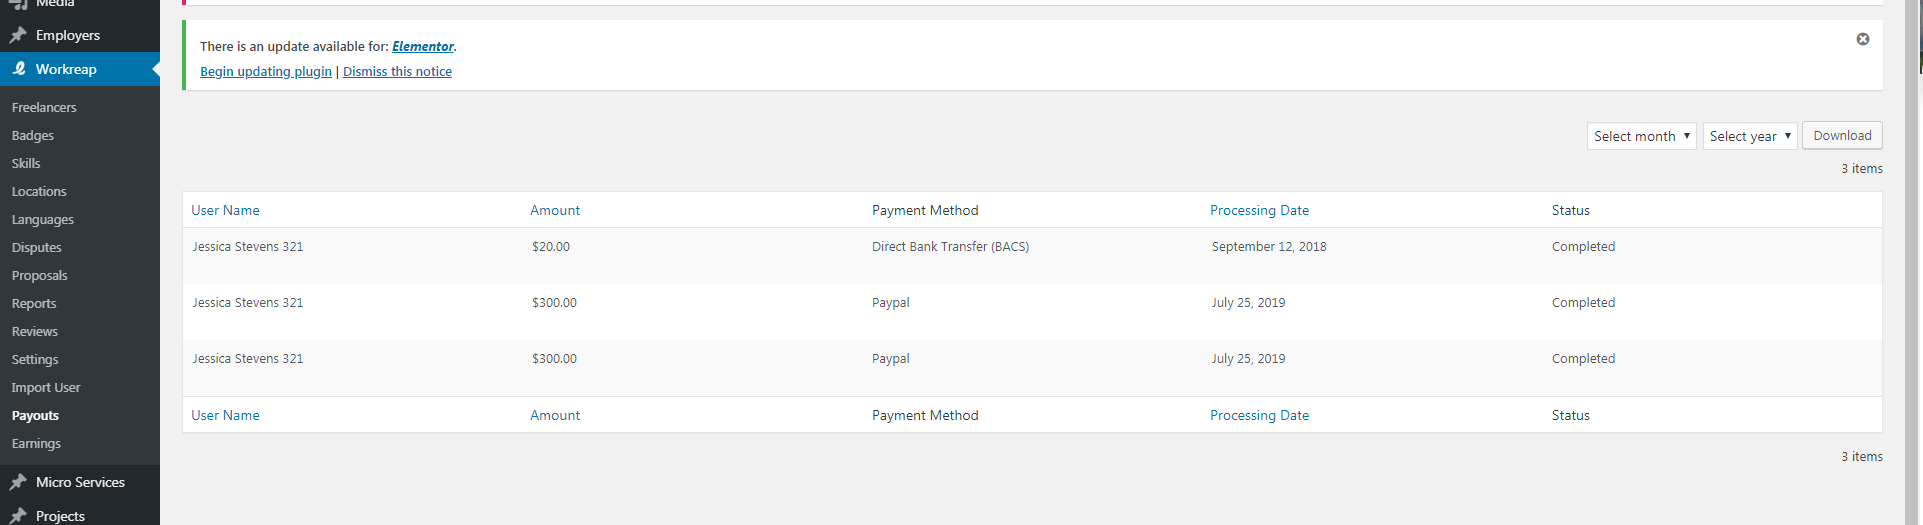
18. How to setup CRON job for payouts and notifications
How to setup CRON job
First of install the Workreap CRON plugin and then we need to set cron job interval to run the cron job as "once a monthly, once a weekly or once a day" in admin > Appearance > Theme Settings > Payment Settings.
Note : After change of cron job interval we need to deactivate and then active the Workreap Cron Plugin (for save intervals in wp cron job)
This CRON job will execute and create the payouts history in the WordPress admin panel and then admin can export the payouts list of the selected month and send the money to freelancers manually.
One more thing freelancer should have added their payout settings in their dashboard. As well as freelancers should have a minimum available balance in their account to withdraw. If the freelancer available balance is less than the minimum amount which the admin has added in Theme Settings > Payment Settings, then the system will not generate a payout list for the freelancers
Jon Notification
For the job notifications, you must check if the user has enabled the job notifications from their panel.
If enabled then and freelancer skills are matched with project skills then the notification will be triggered to that freelancer.
Thanks
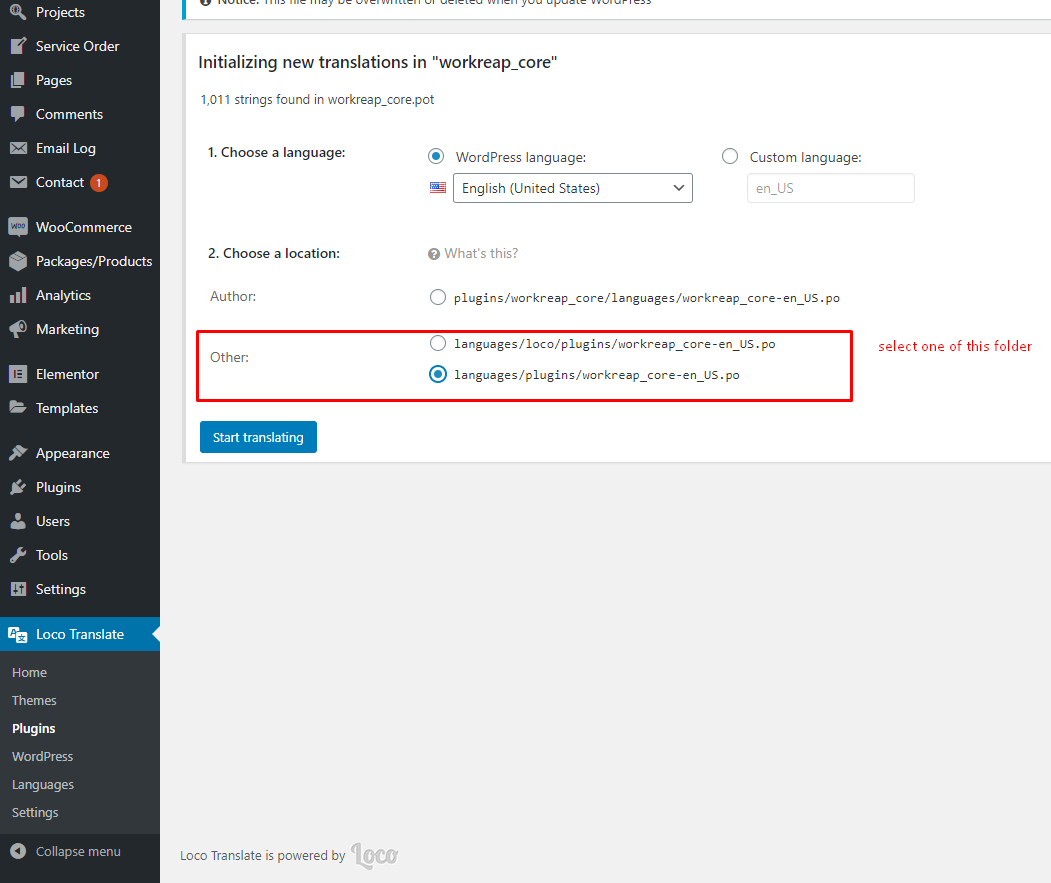
19. How to translate or rename strings in theme and plugins
How to translate or rename strings in theme and plugins
This plugin can be used either for Translations into a different language or to change any string without changing the language. Like if your site has the English language then you can create a template for the English language and star changing strings
You can use the Loco Translate plugin to translate the theme to any language or to update/change any text in the theme and plugin.
-- Install loco translate plugin
-- Please note: For translations, your WordPress should have selected the same language as the language created in Loco translation.
-- Please note, Due to the plugin territory some of our theme functionality can be found in the plugin. So you need to translate the both theme and plugin(workreap_core).
-- Please make sure you have sync the pot templates for both theme and plugin
-- Then create and sync the language templates before add your translations.
Please create template into custom folder rather than in theme or plugin
Now you can find your each string in .po template
-- Please avoid to search long strings. Long string may be in parts so start typing word by word. For example don't search "Find your NEAREST" but search by typing "Find"
One thing which is more important : Please check loco translate settings. Extracting Strings should have minimum size : 1000k
20. Google Map API KEY
Very Important
Please note: There can be a google map API key in demo contents. We suggest you to change google map API key before use our theme and google maps.
Also please note, you must enable the billing for your Google project and then you must enable below API in your project to work the google maps with our theme
Now you are ready to sign in and sign up with LinkedIn
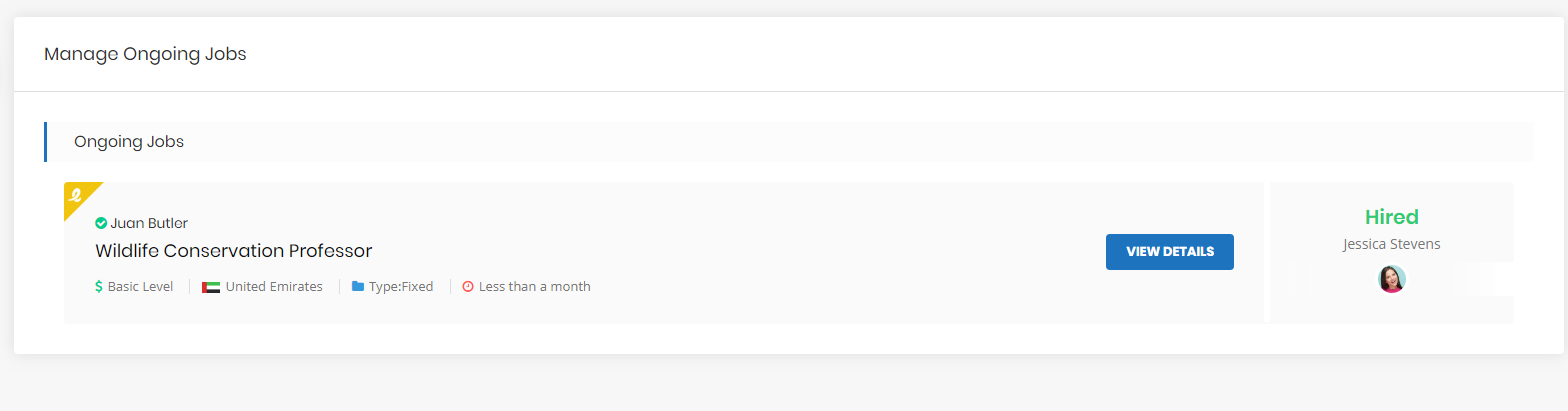
23. How to complete a job
How to complete a job
Employers can complete the job by going to Ongoing Jobs section and then click View Details button to go on history page and then go to View History Button and you will see the history page where you can complete the job.
Step 1
Step 2
Step 3
24. How to Install Workreap WordPress Theme
Import Demo Contents
Before importing demo content, please make sure your server meet minimum server requirements to work smoothly with workreap theme.
On demo content installation's your current changes will be loss, so back your database before install the demo contents
PHP Version Should be > 7.0
PHP Zip extension Should be installed
max_execution_time > 300
max_input_time = 300
memory_limit = 512
post_max_size = 100M
upload_max_filesize = 100M
At this point theme, plugins and required extensions should be installed. To import demo content just follow below mentioned process.
Step 1: Now Go to Admin » Tools » Demo Content Install and you'll see something like shown below.
Just click on install button and wait for demo content importing process.
Step 2: Now Go to Workreap » Import Users section and click the Import Dummy button .Now,wait for demo users import process.
Congratulations!
You’ve setup your theme and ready to go
Due to server memory limit and time execution, may be images(placeholders) will not download properly. So Don't worry.
You can install this plugin : Regenerate Plugin and can Regenerate Thumbnails.
25. How to create Mega Menu in Workreap
How to create Mega Menu in Workreap
To use mega menu, please install mega menu extension first.
Go to Unyson > Download Mega Menu extension
Then go to Appearance > Menus and create your menus
The PHP version should be 7.4(PHP 8.0 is not tested offically with our theme)
PHP Zip extension Should be Installed
max_execution_time = 300
max_input_time = 300
memory_limit = 512
max_input_vars = 4000
post_max_size = 50M
upload_max_filesize = 50M
CURL should be enabled to download Unyson extensions and demo content.
Node.js server should be installed( required only for real-time chat )
allow_url_fopen and allow_url_include
Make sure GD & Imagemagick libraries should be installed on your server. Which is required to upload and generate images sizes
Please note due to a lot of Theme Options, your server should have max_input_vars = 4000 minimum, otherwise your last tabs settings will not be saved
27. How to extend Elementor shortcode
Extend Elementor shortcode
Create folder extend/elementor/shortcodes in child theme and copy the shortcode file from Wrokreap_Core/elementor/shortcodes tothis folder.
e.g to extend the to-freelancer shortcode.
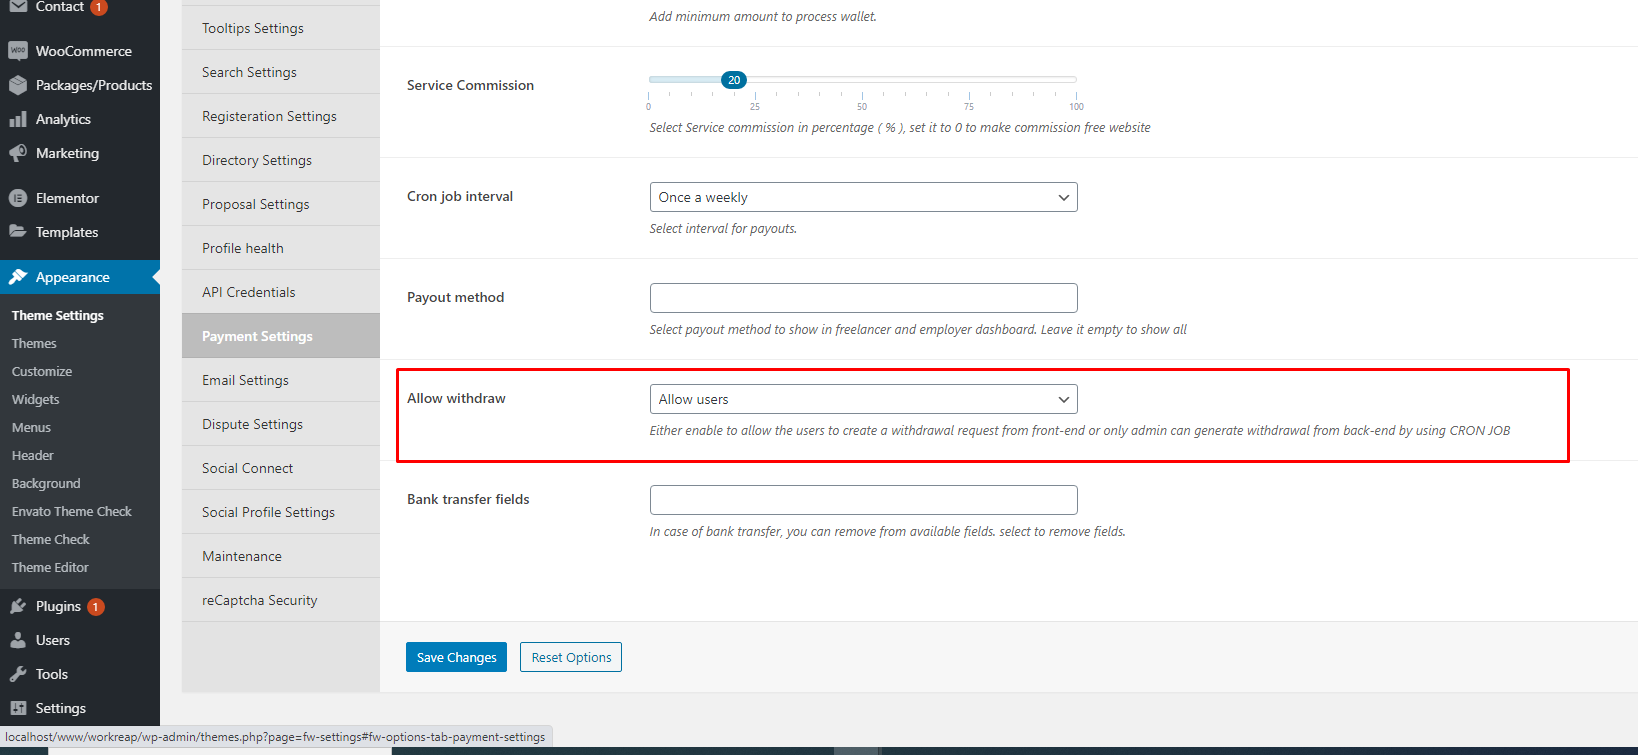
28. Funds Withdraw Request
Funds Withdraw Request
Freelancers can send a request for the funds withdrawal. From their dashboard freelancers can select payment gateway and also payment to withdraw.
On new request admin will receive an email for the funds request
Admin will send the money to freelancers manually. And then admin have to change the status of withdraw request. On change request status, freelancers will get an email that funds has been sent.
Please make sure settings for the payouts in Theme Settings > Payment Settings
Either enable to allow the users to create a withdrawal request from front-end or only admin can generate withdrawal from back-end by using CRON JOB
Please note when user will be logged in as freelancer then Post a service Button will display and job button will be removed.
And when user will be logged in as employer then Post a job Button will display and service button will be removed.
In other cases both button will be removed. When no one is logged in then both button will be appear.
30. How to extend plugin functionality in theme
How to extend plugin functionality in theme
Please follow steps how to extend plugin functionality into the theme.
Create a folder in child theme with name extend
and then copy the shortcodes and hooks folder from plugin( workreap_core ) and paste into extend folder
Then you can find registration and login form and make the changes in it
in this way you can extend your plugin functionality into the theme and on theme update, your changes will not loss.
Please note : If you are using child theme then you can add extend folder in child theme.
31. Import demo pages separately
We have demo content for all the pages. Please don't try to import demo content because it will erase your current data. So backup files and database before import the demo data.
Or import demo data on the staging site and then export elementor templates and import into your live site
32. How to change placeholder images
Hi,
Thank you for contacting us
There are some images coming from the elementor page builder, some of them are coming from the pages, posts, taxonomies, theme settings etc.
You must edit pages, posts, taxonomies, theme settings and also with page builder to change those images.
If you have any support related query please let us know.
Thanks
33. How to remove Native APP Link
How to remove Native APP Link
Admin can remove/disable from Appearance > Theme Settings > General Settings > APP Link
34. What is the difference in project expiry and project deadline date
What is the difference between project expiry and project deadline date
Project expiry: This means when the project will expire and the freelancer will not be able to apply on the project
Project deadline: This means that when the freelancers have to deliver the project
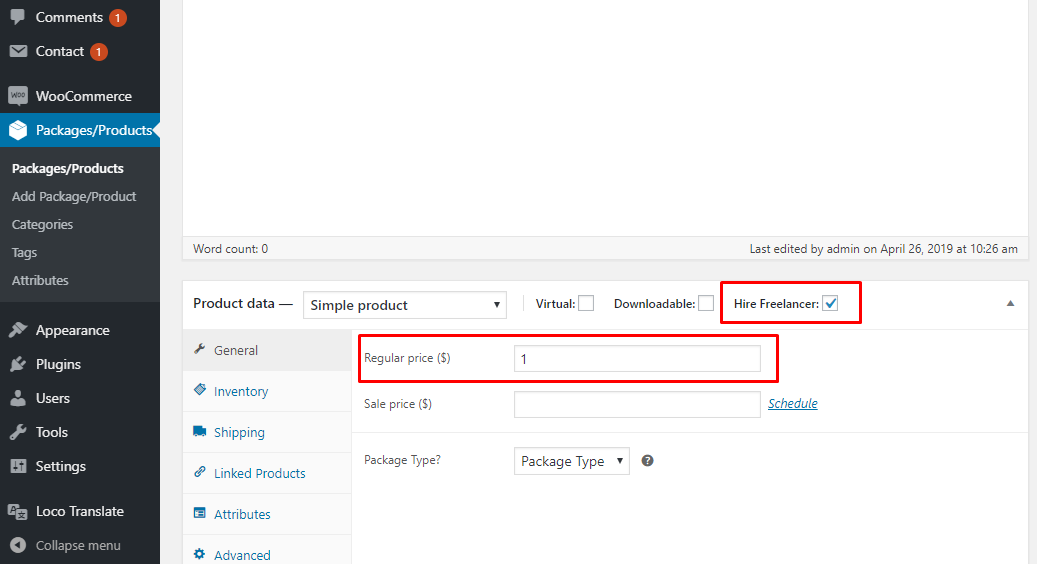
35. Hiring Settings
Hiring Settings
First of all please enable the hiring from Theme Settings.
Then go to Product/Packages section and create a hiring product for payments.
Please make sure you have checked the Hire Freelancer. Then set the price to 1 or what you want, this price will be overridden by the project price while hiring.
For example when an employer will hire a freelancer for the bid $100 then this product price will be overridden with the $100 and WooCommerce order will be placed with that custom price
No need to setup this checkbox for each product or package for freelancer or employers
36. How to create a login page in workreap
How to create a login page
1) Create a page with a login shortcode
2) Assign Login page in Theme Settings
3) Please note login type should be as pages in Theme Settings
4) You are ready now
Please install SSL on your domain. Or ask you hosting and domain providers to install SSL on your domain.
39. How to override shortcodes of workreap theme in elementor in child theme
How to override shortcodes of workreap theme in elementor in child theme
To edit any shortcode of our theme for elementor page builder, you can copy shortcode file from workreap_core plugin and then add into child theme. Below is the path for plugin
40. Preview Images Are Not Included in Theme Package!
Important Note : Please note that demo images are not part of our theme and these are not included in the theme package. These are just for our demo purpose.
We have also mentioned this on our item detail page.
If you have any questions, please let us know.
Thanks!
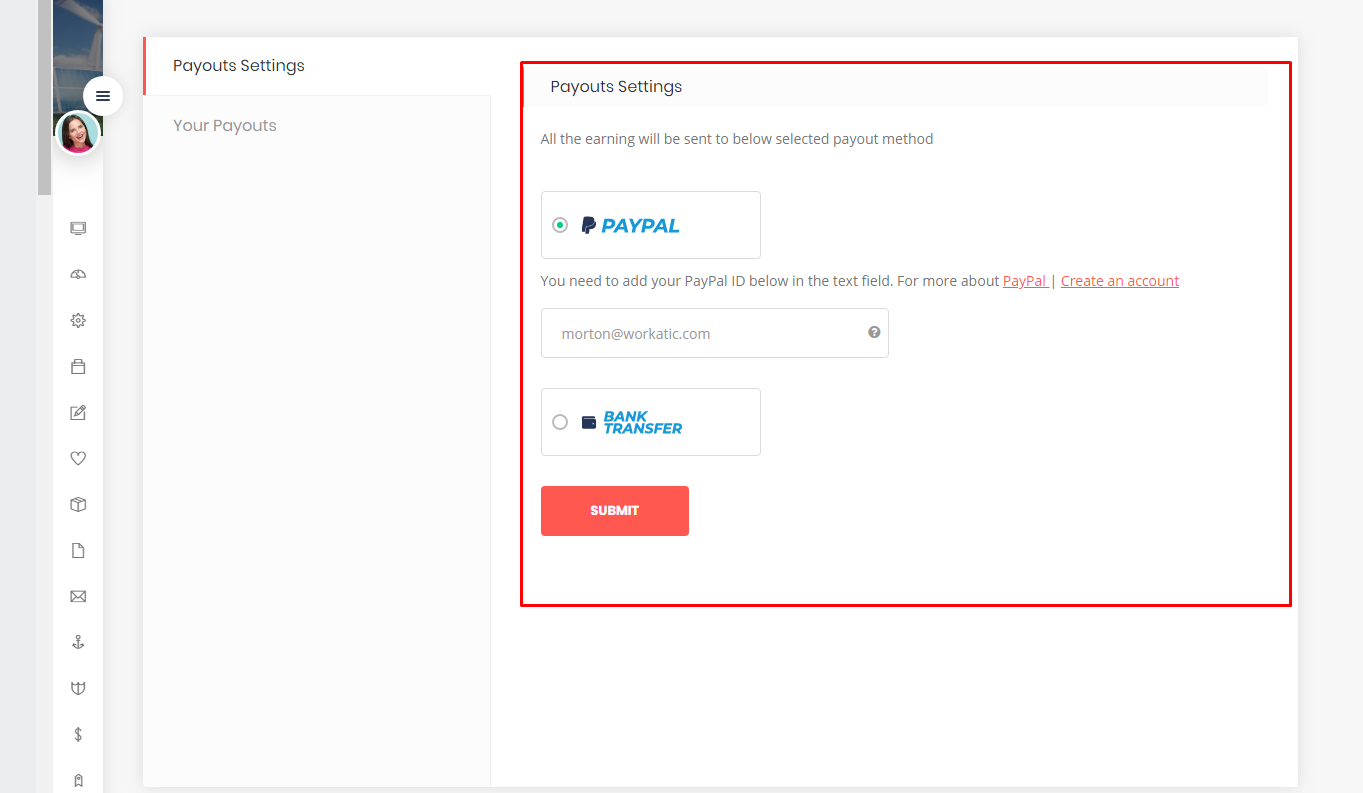
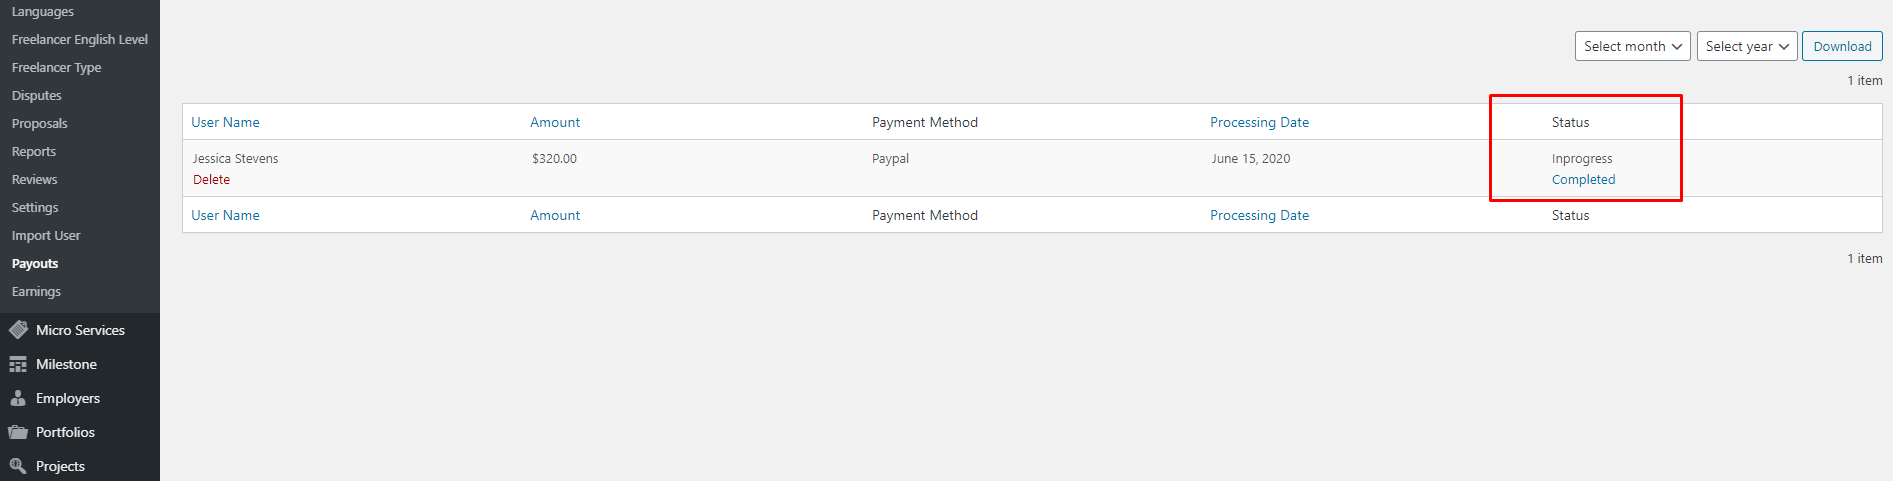
41. How Payouts Works
How Payouts Works
Freelances can select their withdraw method,
Please note freelancers should have write their payout account details to get all the earnings. If freelancer will leave empty details then system will not create payout.
then admin will send money to freelancers manually. Please note their is no automated system to send payments to freelancers. So admin have to send the payments to freelancers manually.
Once payout list will be generated then you have to download and pay all the freelancers manually and also update status of payouts from inprogress to completed back-end of WordPress admin panel
42. How to change Currency
How to change Currency
Currency Can be change from Woo Commerce Settings
Go to WooCommerce > Settings and select the currency
43. What is profile health and how it does work in workreap
What is profile health and how it does work in workreap
Profile health were introduce in release 1.7.3 version. It includes 6 steps and admin can include from them or exclude them.
Please select what you want to include for Profile health, please add percentage, please make sure total percentage should be 100. Like if you select two fields then it could be 50 + 50 or 30 + 70 or what ever you want to add.
Admin can enable to show the profile health on freelancers profiles. This is basically to attract employer and get hires.
Admin can also set minimum percentage if user profile health less than to admin given percentage then user will not show in search listing.
For previous freelancers, you have to update profile health. So you can update from Theme Settings > Profile Health. Just click on link and it will update the all freelancers.
44. How to translate "Home" word in breadcrumbs
How to translate "Home" word in breadcrumbs
You can go to Unyson > Extensions > Breadcrumbs
45. Why WooCommerce doesn't update package or hiring statuses once used PayPal
Why WooCommerce doesn't update package or hiring statuses once used PayPal
We have used WooCommerce for the packages and hiring process and have used the below hooks
Hook: woocommerce_payment_complete
Function: $order->payment_complete().
Most payment methods use the above hook and function to process the order.
Any gateways that default status goes to On Hold or Pending Payment instead of Processing will not process the order against packages update or hiring.
Since WooCommerce version 5.5.0, PayPal Standard is hidden for new installations. This change doesn’t affect existing stores. We strongly encourage everyone using PayPal standard to use the recommended PayPal Payments extension instead, which is our full-stack solution (credit card processing, PayPal checkout, subscriptions, pay later options, etc).
For this, you also contact PayPal about this situation. To make sure of this, you can try to use Stripe Credit card payments plugin, which sends the status processing and all the functions of our theme seem to be working fine.
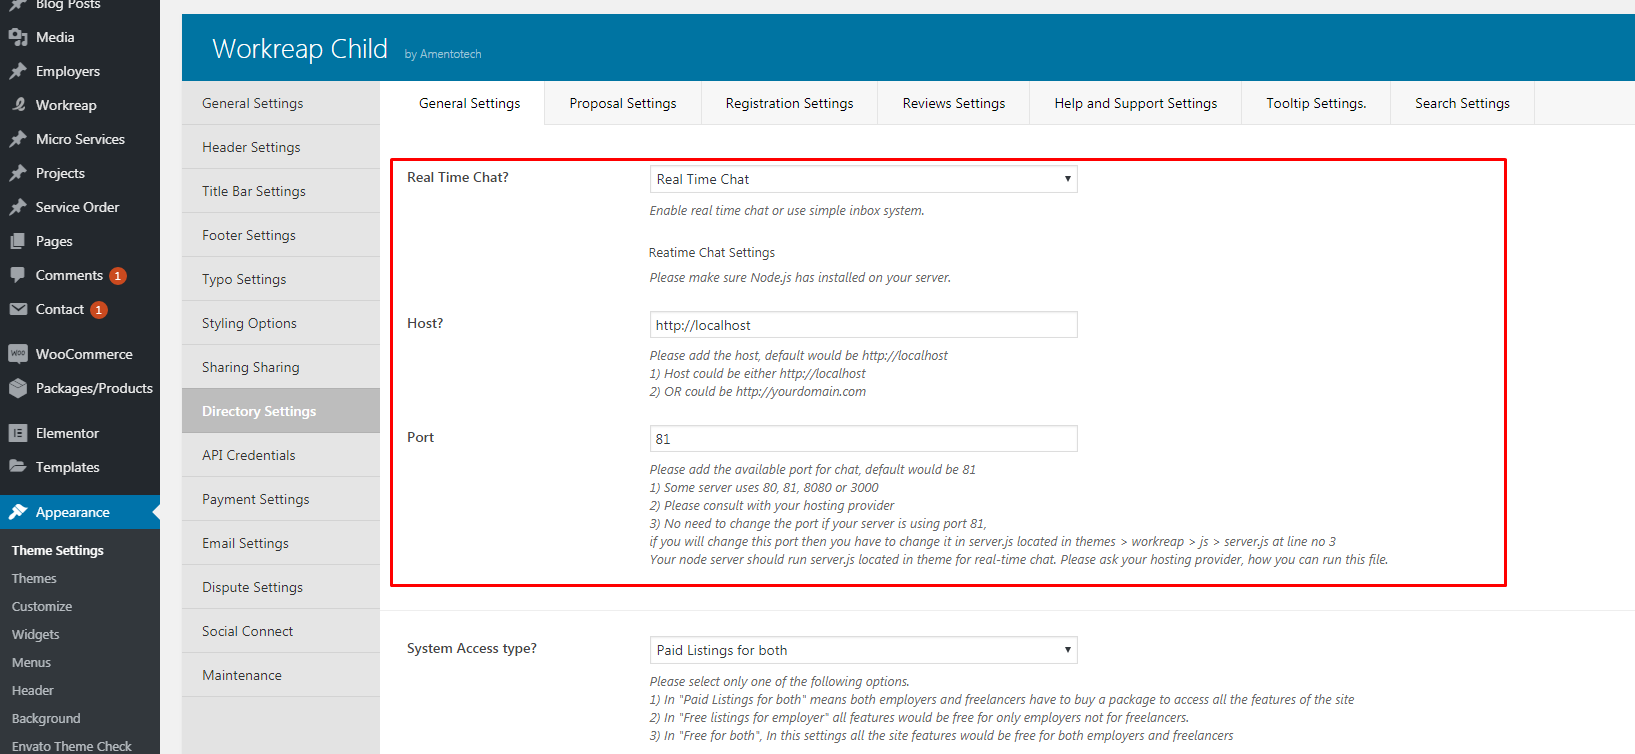
46. How to enable real-time chat
*****************************************************************************************************************How to enable real-time chat
Please note real-time chat will only work if your server does support node.js and you are allowed to run forever commands to run server file. Mostly VPS and Dedicated servers allow you to run node server files.
Admin can enable real-time chat from Theme Settings.
First, make sure that you have installed the node on your server.
Either it's shared hosting or dedicated hosting, and also make sure from your hosting provider that the port is enabled on which you have sent requests.
On shared hosting, contact your hosting provider and ask them to install node, so you can easily run the server.js file by writing this command node server.js from the terminal.
In the case of a dedicated server, you have full access to install the node.
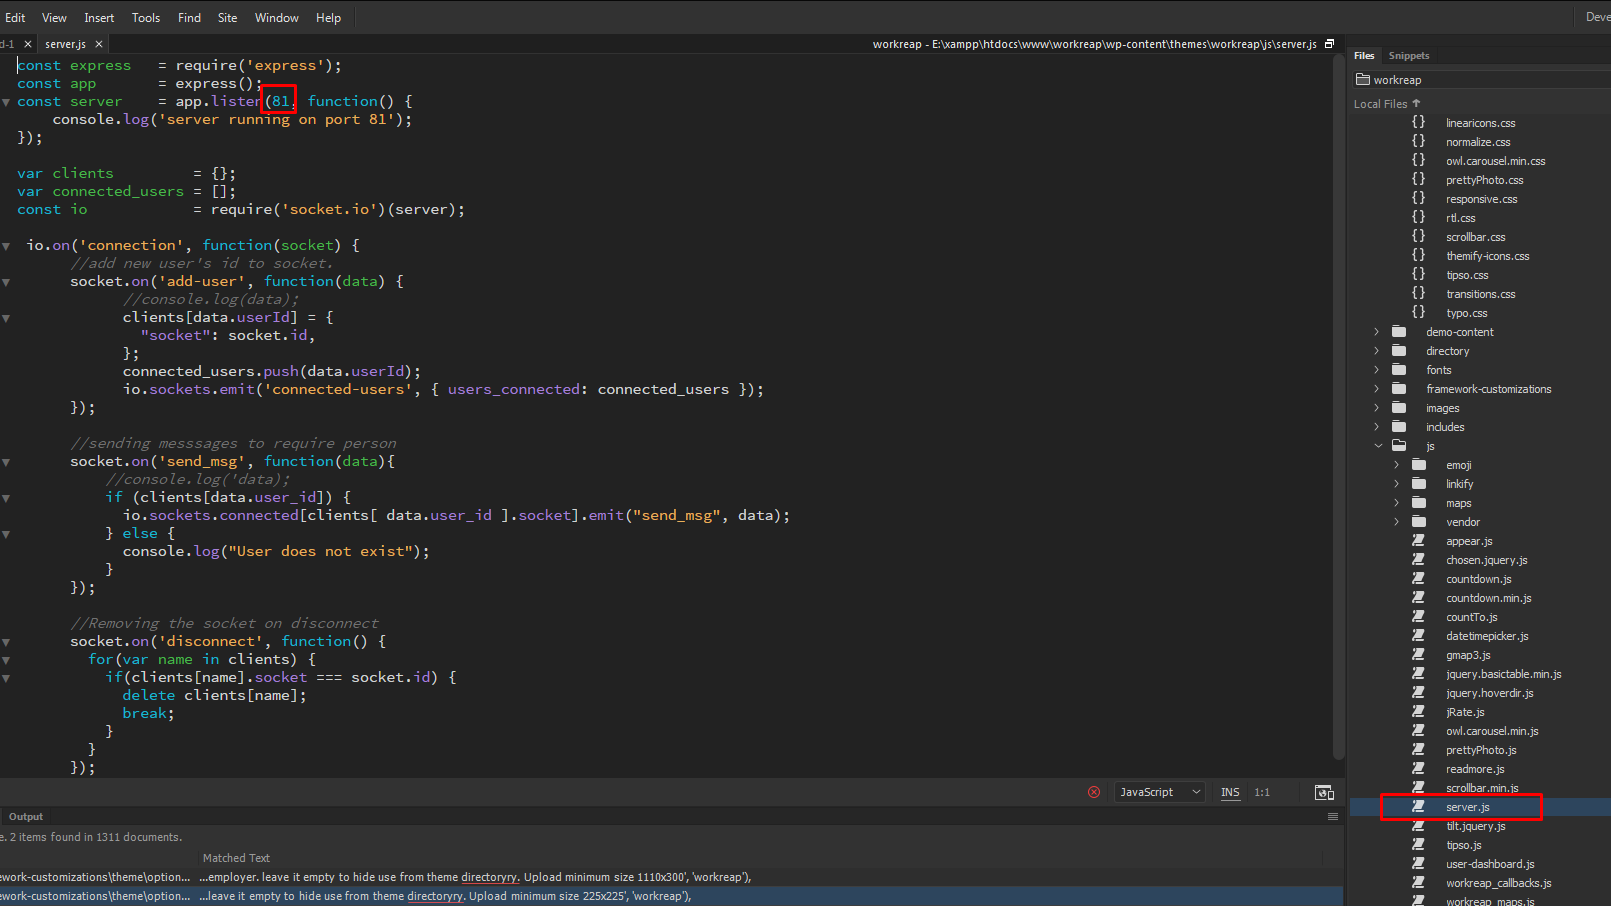
After verifying Please ask your hosting provider to run server.js file through SSH commands
themes > workreap > js > server.js
If you have not used any SSL certificate for your domain then without any problems you can run node chat server file. Just follow the below instructions.
Then from Theme Settings, you can enable either Inbox or real-time chat.
Please replace the hostname with your site name like below
https://yourdomain.com
Just add your host and open port in Theme Settings. Please note if you have used port other than 81 then please update port in server.js as well.
In simple inbox system, users will get messages on page refresh while in real-time chat system users will get instant messages without refreshing the page.
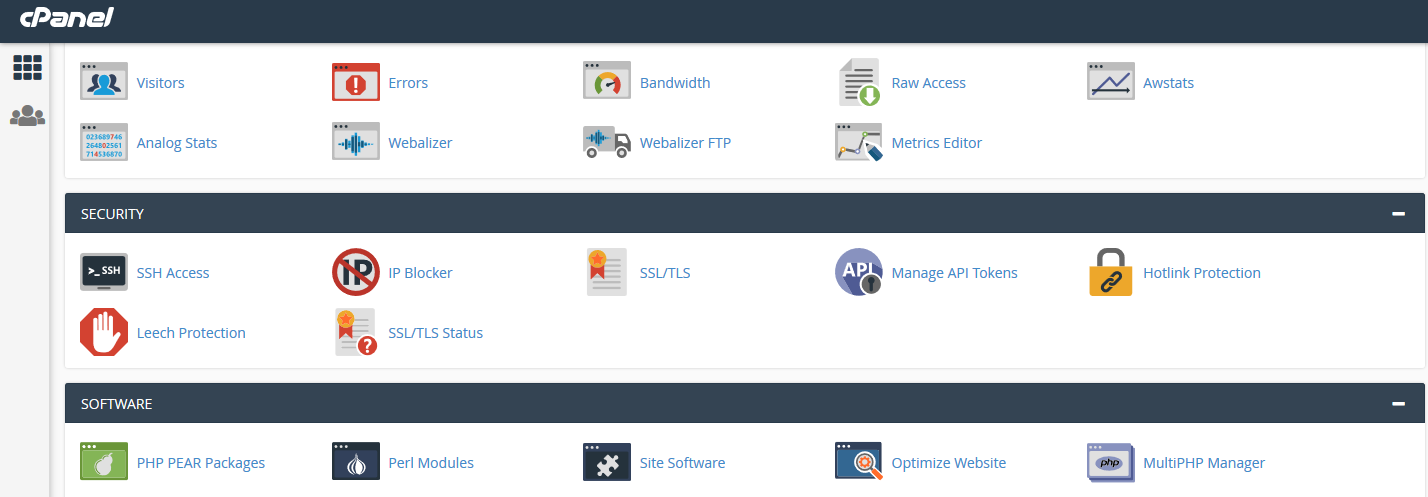
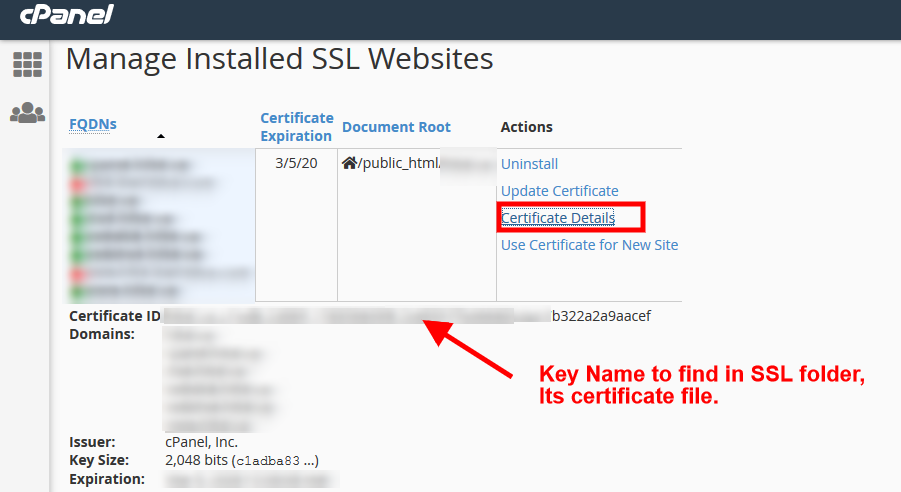
If you have used SSL certificate for your domain, then make sure that you have access to your certificate files on your Cpanel.
Normally SSL certificate files could be found below the path on cpanel.
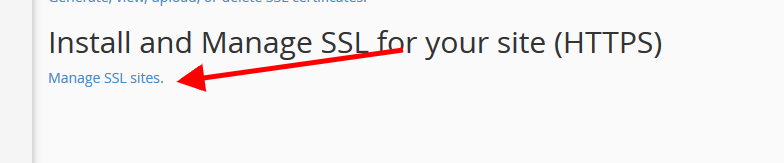
To make sure that which keys and cert file have been used for the SSL certificate, you can find that information on Cpanel SSL/TLS
After that click on Manage SSL
After clinking on Managed SSL Sites.
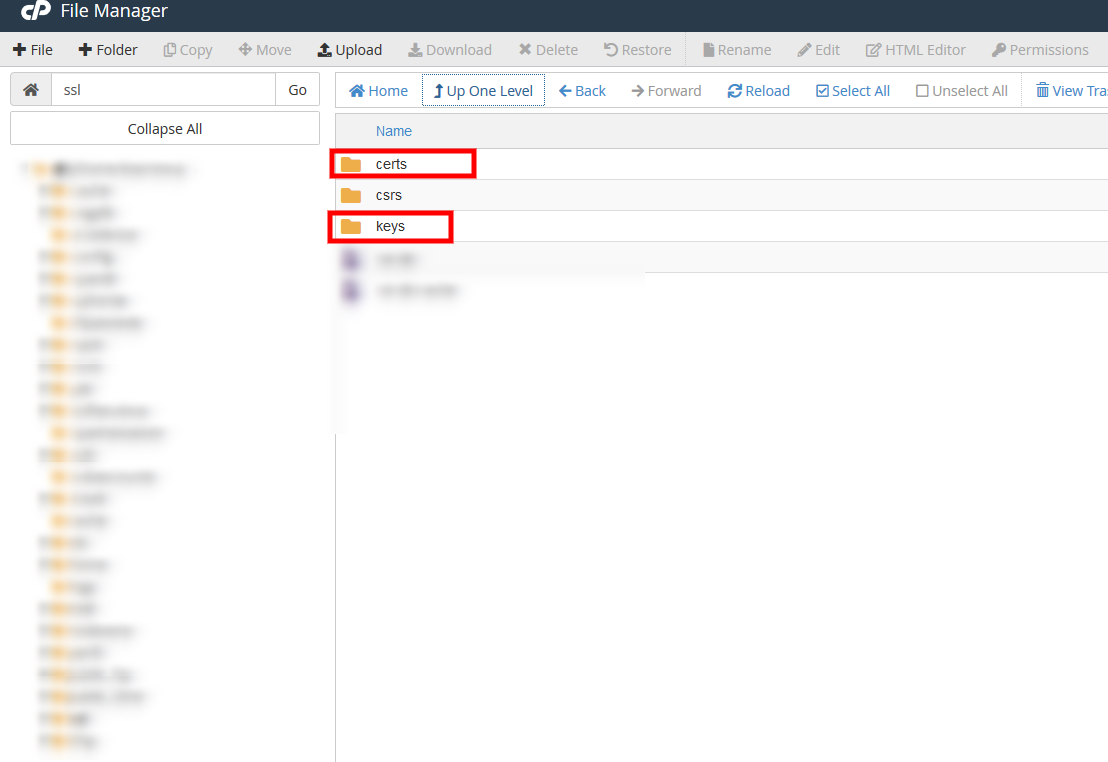
Copy the name of the certificate file and then go to SSL folder path. ( ssl/certs )
Download the file on your PC and then go to SSL/keys folder to download the key file.
After that go to your theme directory and create the below folder path in your theme root location.
/workreap/chat_ssl/
Rename both files so you can remember them easily.
And upload your downloaded key and cert file to this folder.
Now open workreap/js/server-ssl.js file
Now run the node server file from the terminal like this node server-ssl.js
And check the chat it will work now on HTTPS secure protocol.
Note: Only Authorized certificates install on your domain will be recognized for your chat node server and no self-signed certificate will work on the production server.
Extra Notes:
The below process is same for both situations either with SSL or without SSL.
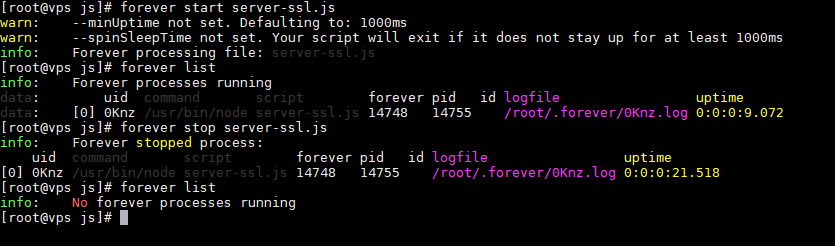
Node JS Chat server is only available or worked if the terminal open, If you have mistakenly closed the terminal or logged out of your session then the node chat server will be stopped.
To run the node js chat app in background process install the npm process manager which is forever.
Run the below commands from your terminal.
npm install forever -g
It will install forever package globally, Note: If you have not installed forever globally then it will not work.
To start the node chat server run the following command.
forever start server-ssl.js
Do not bother the warnings it will run your application in the background now.
To check which node processes are running on the background enter the following command.
forever list
(It will list down all running processes for node js)
And to stop the node chat server enter the below command.
forever stop server-ssl.js
For your eyes only
47. Front-end Dashboard Access
Admin can't access dashboard from front-end.
Dashboard is only accessible for Employers and Freelancers from front-end.
Please make sure you have logged in via Employers or Freelancers account. If you will login with admin account details from front-end then it will not show you dashboard.
48. How offline payments would works
When payments are enabled with WooCommerce
First, please log in as admin and go to Theme Settings > Payments Settings and then select the Enable Payments
This means that you are using WooCommerce checkout process and
Now, You need to active WooCommerce offline payment methods. Go to admin > WooCommerce > Settings > Payments and active the offline payment methods like Cash on delivery, Direct bank transfer etc.
After successfully completing the checkout process, the Order is received as an On Hold status. Now, after receiving the amount admin need to complete the order.
After completing the order, the packages package will be updated. The same thing would be for job and services hiring. When the admin will update the order then the job will be assigned to a freelancer and both will get emails.
When payments are disabled
Now you can also disable the WooCommerce checkout process, this means when you will disable then the system will not use the Woocommerce checkout process and start the job when you will click on hire now button
49. How to change title bar banners
How to change title bar banners
You can add banner from each page settings. It is title bar settings of each page and default could be set from Theme Settings
Default Settings
50. Why freelancers not showing
Why freelancers not showing
Can you please make sure if two filters are not enabled in Theme Settings
Please go to Appearance > Theme Settings > Directory Settings > Images Settings
here you can change the icon images
53. How to setup trial packages
How to setup trial packages
Admin can setup a trial package for new users. This trial package will be assigned to new registered users on the site.
This package will be assigned automatically. Also users will not see any trial package in their dashboard.
To create trial package go to Packages/Products > Select Trial for Freelancers or Employer
Admin can create only one trial package for freelancers and employers
54. Why email took time to arrive or not working
Why email is not working
Please make sure if emails are not in spams or junks folders.
Why email took time to arrive
Email delay(arrival to the inbox) could be due to any reason. First of all, this could be your email content. Some email providers like Gmail take time to read content and decide to either put it to spam or in the inbox.
So your content should be strong and don't write such kind of content which could be suspicious.
This is not related to the theme because when any event trigger then it send an email because PHP functions run.
When your click it will trigger an email and you can see the email log it on the back-end.
55. How to enable or disable switch user in workreap
How to remove switch Account Settings from dashboard
Please go to Theme Settings > Directory Settings
56. How do credits of freelancers work
How do credits of freelancers work
When user will subscribe to a package then freelancer would get Credit to apply on the jobs. Admin can set how many number of credits required to bid on the projects.
Let say freelancer have 60 credits and admin have set per job 5 credits. Then freelancer can apply on 12 jobs.
After applying on first job 5 credits would be excluded from his/her package.
Total Credits - Required Credits to Apply = Remaining
57. How to hide search results for visitors and show a banner
How to hide search results for visitors and show a banner
You can enable or disable to show a specific number of posts and then show a banner from
This wiki covers how to set up LiteSpeed Web Server so that a long-running PHP script will not be interrupted before it has finished.
Reason
Some PHP scripts need to run for long periods of time without interruption. Examples include WordPress modules such as BackupBuddy, ImportBuddy, or any other module that relies on a WordPress built-in cron job. Whenever a PHP application rebuilds MySQL indexes, the process may run for a long time.
How-To's
Generally, allowing a PHP script to run forever is not desirable. Thus there are a number of features (in LSWS and built into PHP) that may prevent a PHP process from running long enough to finish. You may need to set up more than one of the following configurations to ensure your application works correctly.
Turn off aborting for a broken connection
When a user closes a connection (by closing a window, for example), LSWS will abort processing that PHP script by killing the PHP process. This is to avoid wasting system resources and prevent certain types of DoS attacks.
In some cases, though, it is preferable to not to abort the PHP script regardless of whether the connection has been closed. For example, Wordpress built-in cron jobs start a background job by sending a request to wp-cron.php then immediately closing the connection without waiting for response. In order for the cron job to complete, though, the web server must keep the PHP engine running without interruption.
With Apache mod_php, the ignore_user_abort setting allows a user to trigger a long-running process and then close the browser or navigate away from the page without killing the PHP/MySQL process. This setting is not supported by LSWS (or any Apache suEXEC setup).
Aborting for a broken connection can instead be turned off at the server level in LSWS's WebAdmin console or by using LiteSpeed's “noabort” environment variable.
Globally via the WebAdmin
WebAdmin console > Configuration > Server > General > External Application Abort
Set External Application Abort to “No Abort” to stop all applications from aborting even when a connection has been broken.
Through the "noabort" environment variable
Aborting for a broken connection can be turned off by using the request-level “noabort” environment variable. This can be done in a rewrite rule or using the SetEnv/SetEnvIf directives. “noabort” is a LiteSpeed-specific environment variable, so all the following rules should be placed in
<IfModule Litespeed> ... </IfModule>
The [E=noabort:1] flag can be added to any rewrite rule. The rewrite rule can be in an Apache .htaccess file or vhost-level configuration file. The rewrite flag should usually be used for a single account only. If you need to do a server-level configuration that will apply to all accounts (though perhaps only for certain scripts), you should use the SetEnvIf directive.
Rewrite rule examples:
For all requests.
RewriteEngine On
RewriteRule .* - [E=noabort:1]
For wp-cron.php, backupbuddy.php, and importbuddy.php only.
RewriteEngine On
RewriteRule (wp-cron|backupbuddy|importbuddy)\.php - [E=noabort:1]
SetEnv/SetEnvIf directive examples:
For all requests.
SetEnv noabort 1
For certain URIs (i.e. wp-cron.php, backupbuddy.php, and importbuddy.php).
Note: Rewrite rules cannot be easily inherited. Thus, if you want to affect all accounts with one setting, the SetEnvIf directive should be used.
LiteSpeed connection timeout override
If a script does not send back anything for a long time, this can trigger a connection timeout and the server will close the client connection. This is done to prevent poorly written PHP scripts from tying up the server. To get desired functionality from your web applications, though, you may need to prevent the connection from being timed out. (If the “noabort” environment variable above has been set, the script will continue to run even though the connection has been broken. Your application, though, may require the connection to stay open for correct functionality.)
Connection timeout can be prevented by either increasing the global connection timeout setting (via the WebAdmin console) or using LiteSpeed's “noconntimeout” environment variable.
This setting can be increased to allow scripts to run longer (though they will still time out after the specified time has elapsed).
If LiteSpeed ADC is running in front , ADC connection timeout also need to adjust.
Through "noconntimeout" environment variable
Similarly to the “noabort” environment variable, you can add the “noconntimeout” environment variable via a rewrite rule or using the SetEnv/SetEnvIf directives. (The rewrite flag is preferred for controlling a single account. The SetEnv/SetEnvIf directives are preferred for rules that will apply to all accounts.) “noconntimeout” is a LiteSpeed-specifc environment variable, so all the following examples should be placed inside:
<IfModule Litespeed> ...
</IfModule>
Rewrite rule examples:
For all requests.
RewriteEngine On
RewriteRule .* - [E=noconntimeout:1]
For wp-cron.php, backupbuddy.php, and importbuddy.php only.
In ProcessGroup mode, the "LSAPI_MAX_PROCESS_TIME" environment variable (default 3600 seconds) controls the maximum processing time allowed when processing a request. If a child process cannot finish processing the request in the given time period, it will be killed by the parent process. This option can get rid of a dead or a runaway child process.
Set the environment variable in your external application settings (WebAdmin > Configuration > Server(or Vhost) > External App > your external application > Environments).
PHP execution time in php.ini
The max_execution_time setting sets the maximum time in seconds a PHP script is allowed to run before it is terminated by the parser. This helps prevent poorly written scripts from tying up the server. This time does not include time spent in system calls or network I/O (unlike the “LSAPI_MAX_PROCESS_TIME” environment variable above). Thus a process will usually trigger “LSAPI_MAX_PROCESS_TIME” before triggering a max_execution_time setting of a similar length. The default setting is 30.
Example setting (in a php.ini file):
max_execution_time=36000
PHP coding
One of our customers had success making sure a PHP script did not time out by adding the following PHP code:
<?php
//avoid apache to kill the php running
ignore_user_abort(true);
//start buffer output
ob_start();
echo "show something to user";
//close session file on server side to avoid blocking other requests
session_write_close();
//send length header
header("Content-Length: ".ob_get_length());
header("Connection: close");
//really send content, can't change the order:
//1.ob buffer to normal buffer, //2.normal buffer to output
ob_end_flush();
flush();
//continue do something on server side
ob_start();
//replace it with the background task
sleep(50); ob_end_clean();
?>
Note: You need to turn off keepalive connections for this request. This can be done with a rewrite rule.
Troubleshooting
"noabort" rule should be placed at the top of the .htaccess
A test.php script sets sleep time to 320 seconds, like so:
?php
//Store the micro time so that we know
//when our script started to run.
$executionStartTime = microtime(true);
// displaying time
echo date('h:i:s')."\n" ;
// delaying execution of the script for 2 seconds
sleep(320);
// displaying time again
echo date('h:i:s');
//At the end of your code, compare the current
//microtime to the microtime that we stored
//at the beginning of the script.
$executionEndTime = microtime(true);
//The result will be in seconds and milliseconds.
$seconds = $executionEndTime - $executionStartTime;
//Print it out
echo "This script took $seconds to execute.";
?>
When it is run, however, it errors out and stops at 300 seconds (5 minutes). phpinfo.php shows max_exectution_time is 600. The script times out due to LiteSpeed Web Server's default 300-second timeout. The default, however, can be overridden by a noabort or noconntimeout rule.
In this example, .htaccessdoes have a noabort rule, but the test script still stops at 300 seconds:
Oct8ne                <IfModule mod_rewrite.c>                RewriteEngine on                RewriteRule ^oct8ne/frame/([a-zA-Z]+)$ index.php?fc=module&module=oct8ne&controller=oct8neconnector&octmethod=$1&%{QUERY_STRING} [QSA,L]                </IfModule>                #End_Oct8ne                # ~~start~~ Do not remove this comment, Prestashop will keep automatically the code outside this comment when .htaccess will be generated again
# .htaccess automaticaly generated by PrestaShop e-commerce open-source solution
# http://www.prestashop.com - http://www.prestashop.com/forums
<IfModule mod_rewrite.c>
<IfModule mod_env.c>
SetEnv HTTP_MOD_REWRITE On
</IfModule>
RewriteEngine on
#
RewriteRule . - [E=REWRITEBASE:/]
RewriteRule ^api$ api/ [L]
RewriteRule ^api/(.*)$ %{ENV:REWRITEBASE}webservice/dispatcher.php?url=$1 [QSA,L]
# Images
RewriteRule ^([0-9])(\-[_a-zA-Z0-9-]*)?(-[0-9]+)?/.+\.jpg$ %{ENV:REWRITEBASE}img/p/$1/$1$2$3.jpg [L]
RewriteRule ^([0-9])([0-9])(\-[_a-zA-Z0-9-]*)?(-[0-9]+)?/.+\.jpg$ %{ENV:REWRITEBASE}img/p/$1/$2/$1$2$3$4.jpg [L]
RewriteRule ^([0-9])([0-9])([0-9])(\-[_a-zA-Z0-9-]*)?(-[0-9]+)?/.+\.jpg$ %{ENV:REWRITEBASE}img/p/$1/$2/$3/$1$2$3$4$5.jpg [L]
RewriteRule ^([0-9])([0-9])([0-9])([0-9])(\-[_a-zA-Z0-9-]*)?(-[0-9]+)?/.+\.jpg$ %{ENV:REWRITEBASE}img/p/$1/$2/$3/$4/$1$2$3$4$5$6.jpg [L]
RewriteRule ^([0-9])([0-9])([0-9])([0-9])([0-9])(\-[_a-zA-Z0-9-]*)?(-[0-9]+)?/.+\.jpg$ %{ENV:REWRITEBASE}img/p/$1/$2/$3/$4/$5/$1$2$3$4$5$6$7.jpg [L]
RewriteRule ^([0-9])([0-9])([0-9])([0-9])([0-9])([0-9])(\-[_a-zA-Z0-9-]*)?(-[0-9]+)?/.+\.jpg$ %{ENV:REWRITEBASE}img/p/$1/$2/$3/$4/$5/$6/$1$2$3$4$5$6$7$8.jpg [L]
RewriteRule ^([0-9])([0-9])([0-9])([0-9])([0-9])([0-9])([0-9])(\-[_a-zA-Z0-9-]*)?(-[0-9]+)?/.+\.jpg$ %{ENV:REWRITEBASE}img/p/$1/$2/$3/$4/$5/$6/$7/$1$2$3$4$5$6$7$8$9.jpg [L]
RewriteRule ^([0-9])([0-9])([0-9])([0-9])([0-9])([0-9])([0-9])([0-9])(\-[_a-zA-Z0-9-]*)?(-[0-9]+)?/.+\.jpg$ %{ENV:REWRITEBASE}img/p/$1/$2/$3/$4/$5/$6/$7/$8/$1$2$3$4$5$6$7$8$9$10.jpg [L]
RewriteRule ^c/([0-9]+)(\-[\.*_a-zA-Z0-9-]*)(-[0-9]+)?/.+\.jpg$ %{ENV:REWRITEBASE}img/c/$1$2$3.jpg [L]
RewriteRule ^c/([a-zA-Z_-]+)(-[0-9]+)?/.+\.jpg$ %{ENV:REWRITEBASE}img/c/$1$2.jpg [L]
# AlphaImageLoader for IE and fancybox
RewriteRule ^images_ie/?([^/]+)\.(jpe?g|png|gif)$ js/jquery/plugins/fancybox/images/$1.$2 [L]
# Dispatcher
RewriteCond %{REQUEST_FILENAME} -s [OR]
RewriteCond %{REQUEST_FILENAME} -l [OR]
RewriteCond %{REQUEST_FILENAME} -d
RewriteRule ^.*$ - [NC,L]
RewriteRule ^.*$ %{ENV:REWRITEBASE}index.php [NC,L]
AddType application/vnd.ms-fontobject .eot
AddType font/ttf .ttf
AddType font/otf .otf
AddType font/woff2 .woff2
AddType application/x-font-woff .woff
<IfModule mod_headers.c>        <FilesMatch "\.(ttf|ttc|otf|eot|woff|woff2|svg)$">                Header set Access-Control-Allow-Origin "*"        </FilesMatch>
</IfModule>
#If rewrite mod isn't enabled
ErrorDocument 404 /index.php?controller=404
# ~~end~~ Do not remove this comment, Prestashop will keep automatically the code outside this comment when .htaccess will be generated again
# # BEGIN litespeed noconntimeout noabort
<IfModule Litespeed> RewriteEngine On RewriteRule .* - [E=noabort:1]
</IfModule>
# # END litespeed noconntimeout noabort
# php -- BEGIN cPanel-generated handler, do not edit
# Set the “ea-php70” package as the default “PHP” programming language.
<IfModule mime_module>  AddHandler application/x-httpd-ea-php70 .php .php7 .phtml
</IfModule>
# php -- END cPanel-generated handler, do not edit
# BEGIN cPanel-generated php ini directives, do not edit
# Manual editing of this file may result in unexpected behavior.
# To make changes to this file, use the cPanel MultiPHP INI Editor (Home >> Software >> MultiPHP INI Editor)
# For more information, read our documentation (https://go.cpanel.net/EA4ModifyINI)
<IfModule php7_module>   php_flag display_errors Off   php_value max_execution_time 600   php_value max_input_time 600   php_value max_input_vars 6000   php_value memory_limit 1024M   php_value post_max_size 1024M   php_value session.gc_maxlifetime 1440   php_value session.save_path "/var/cpanel/php/sessions/ea-php73"   php_value upload_max_filesize 1024M   php_flag zlib.output_compression Off
</IfModule>
<IfModule lsapi_module>   php_flag display_errors Off   php_value max_execution_time 600   php_value max_input_time 600   php_value max_input_vars 6000   php_value memory_limit 1024M   php_value post_max_size 1024M   php_value session.gc_maxlifetime 1440   php_value session.save_path "/var/cpanel/php/sessions/ea-php73"   php_value upload_max_filesize 1024M   php_flag zlib.output_compression Off
</IfModule>
# END cPanel-generated php ini directives, do not edit
The problem is the position of the noabort rule. it was placed nearly at the end of .htaccess, and as such, it is prevented from being executed by the other rules that come before it. RewriteRule .* - [E=noabort:1]
Move the rule to the very top of all .htaccess rewrite rules, and the test script will no longer time out.
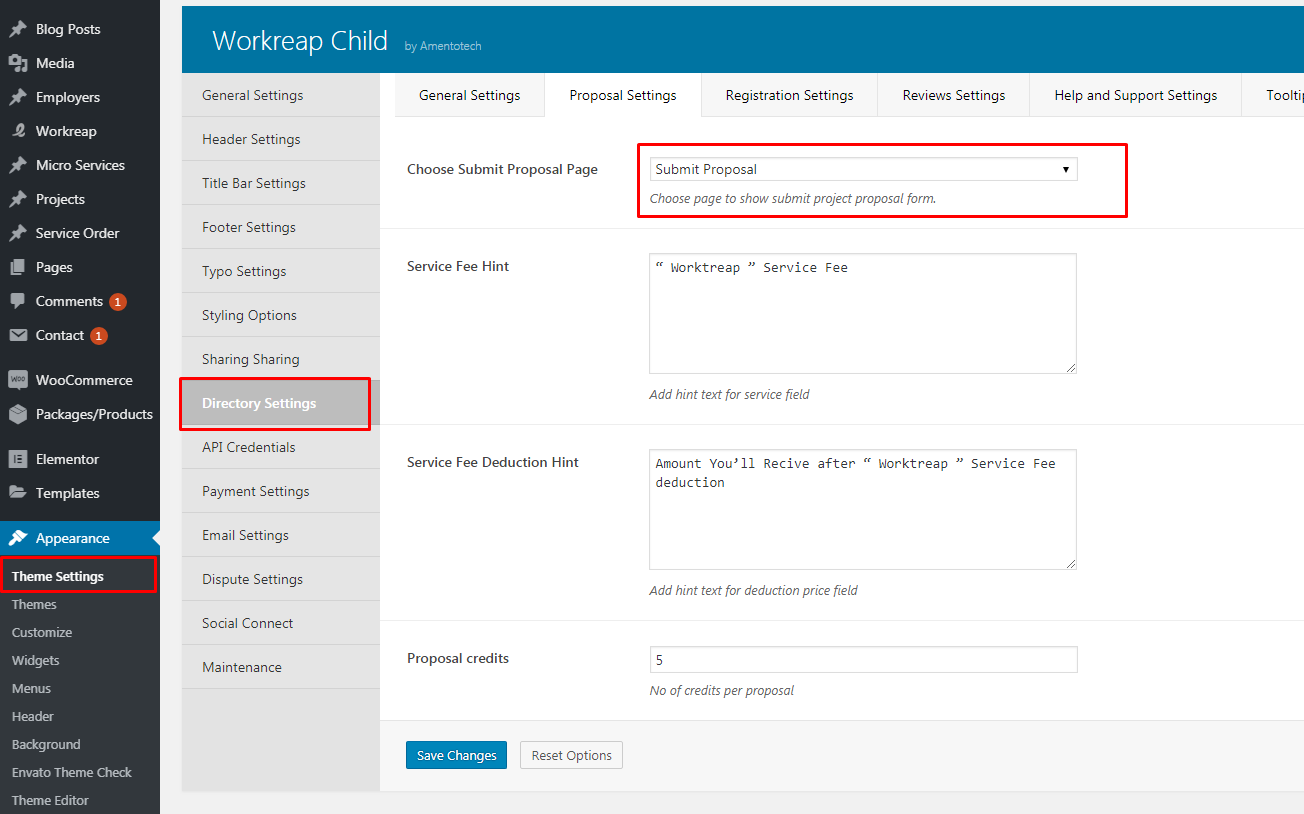
60. How admin can enable either jobs posting or service posting or both
How admin can enable either jobs posting or service posting or both
Admin can enable either site would be like upwork where only employers can post jobs and freelancers can bid on these jobs or like fiverr where only freelancer can post their services and employers can only buy these services.
Admin can set from Theme Settings > General Settings > Directory Settings > System Access type
Please select only one of the options.
1) In "Paid Listings for both" means both employers and freelancers have to buy a package to access all the features of the site 2) In "Free listings for employer" all features would be free for only employers not for freelancers. 3) In "Free for both", In this settings all the site features would be free for both employers and freelancers
62. How to use AtomChat into Workreap Theme
How to use AtomChat into Workreap Theme
AtomChat is not part of the theme, this is optional chat integration
1) Please install the AtomChat plugin and then subscribe to a package. You need to buy AtomChat Go Plan
Please make sure you have selected Third Party AtomChat in Theme Settings
3) After that please go to the dashboard by clicking on the Manage button in the AtomChat dashboard Then go to Settings > API Key > and Copy the API and add it into the AtomChat plugin in WordPress
4) Now you are ready to use AtomChat. Employers can invite the freelancers to initiate chat
63. How to change slug for custom post types
How to change slug for custom post types
This can be changed from Workreap > Settings
Please note, WordPress has some reserved words and you can't use those like category
This feature was added in release 1.6.2, so please update both theme and plugins to get it work. You can also disable from Theme Settings > Directory Settings
65. How to hide menu items from both left and top menu
How to hide menu items from both left and top menu
Admin can hide menu items from Theme Settings > Directory Settings
66. How to create a messenger page with WP Guppy
How to create a messenger page with WP Guppy
Admin can create a message page with WP Guppy plugin. We have Elementor & WP Bakery Page builder compatibility as well as the shortcode options to create the messenger page
67. Server requirements
Below are the server requirements for the theme
The PHP version should be 7.4(PHP 8.0 is not tested officially with our plugin/theme)
PHP Zip extension Should be Installed
max_execution_time = 300
max_input_time = 300
memory_limit = 512
max_input_vars = 3000
post_max_size = 50M
upload_max_filesize = 50M
CURL should be enabled to download Unyson extensions and demo content.
Node.js server should be installed( required only for real-time chat )
allow_url_fopen and allow_url_include
Make sure GD & Imagemagick libraries should be installed on your server. Which is required to upload and generate images sizes
Please note due to a lot of Theme Options, your server should have max_input_vars =3000 minimum, otherwise, your last tabs settings will not be saved
68. How to hide departments from the registration page
How to hide departments from the registration page
Admin can disable the departments and employees section from the registration page, filters and from the dashboard
Theme Settings > Directory Settings > Company Settings
The departments list can be changed from back-end but no of employees section can't be changed
69. How to translate WP Guppy
How to translate WP Guppy
You can change any string from the WP Guppy > Translation or you can also use the loco translate plugin to find the strings and replace them with your own strings
You can poy above URL and then paste into your browser and hit this
71. Dashboard Access
Admin can't access dashboard from front-end.
Dashboard is only accessible for Doctors,Hospitals and Patients or regular user from front-end.
Please make sure you have logged in viaDoctors, Hospitals and Patients or regular user account. If you will login with admin account details from front-end then it will not show you dashboard.
72. ModSecurity and Theme Settings saving trigger 403 Errors
ModSecurity and Theme Settings saving trigger 403 Errors
If while saving the Theme Settings, your server is throwing the 403 error then this means that your server is blocking the request.
So you must consult with your hosting provider by telling them that this issue appears while saving some data.
They will be able to fix that issue, this issue could be maybe because of some ModSecurity settings or something else with your hosting permissions
What is ModSecurity
ModSecurity is for increasing the security of servers. It is an Apache module that works as a web application firewall. It blocks known exploits and provides protection from a range of attacks against web applications. Its activity may cause such issues from time to time when requests sent to the server match with ModSecurity rules. Sometimes such requests are false-positive
If still, you are facing an issue, please provide requested details to our support team and we will be happy to investigate the issue
73. Workreap: Services search layout
Workreap: Services search layout
We have 3 services layout and settings can be enabled from
Admin can enable the social media profiles for both types of users from the back-end
Theme Settings > Social Profile Settings
And then users will be able to add social links from front-end
75. Why email took time to arrive or not working
Why email took time to arrive or not working
1) Why email are not working
Please make sure if emails are not in spams or junks folders.
2) Why email took time to arrive
Email delay(arrival to the inbox) could be due to many reason. First of all this could be your email content. Some email providers like gmail take time to read content and decide either put it to spam or in inbox.
So your content should be strong, and don't write such kind of content which could be a suspicious.
This not related to application because when any event trigger then it send email because php functions runs.
You might check other SMTP host other than gmail, like sendgrid which give the 100% accuracy to target the inbox and send emails timely
On some servers due to max execution time or memory limit, menus will display the below screenshot. This happens when during demo content import, the system doesn't assign the menu location to the menus.
What you have to do is, just open the WordPress admin > Appearance > Menus > Manage location
Select the location and then save. This will correct the menus
77. How to Update Theme, When New Update release
How to Update Theme, When New Update release
Please download latest version of theme package from themeforest.net
Please go to your download section at themeforest and then download theme files :
And then you need to make sure that:
-- You have taken a complete backup of your theme and plugin(tuturn) files. This is important because just in case you have made any mistakes or had made any changes in the theme or plugin, you can recover those from your backup.
-- Once the backup has been taken, you can either delete the theme and plugin and upload a newer one or replace files by using FileZilla or another file transfer protocol.
Please note: Don't import users or demo content. It will override and delete your database contents. You just need to replace/delete files.
Thanks!
78. Hourly rate settings for freelancers
Hourly rate settings for freelancers
Admin can enable to show/hide the hourly rate for freelancers.
chat_id => This is WordPress user ID
chat_type=1 => Leave this as it is
81. How to enable send service quote and how it works
How to enable sending service quotes and how it works
You can enable the send service quote options from Theme Settings > Directory Settings > Services Settings
Once activated then all the employers who contacted the freelancer will show in the listing to send an offer. Freelancer must select service and then employer with a custom price to send the offer
82. How to import the users from back-end by using excel file
How to import the users from back-end by using excel file
Admin can import the Freelancers and Employersin bulk by using excel file
Please go to Theme Settings > Directory Settings and Dashboard Settings section
here you can change the icon images
84. Why there is no ongoing service or project on hiring
Why there is no ongoing service or project on hiring
We have used WooCommerce for the packages and hiring process and have used below the hook
woocommerce_payment_complete
Once any payment arrived successfully then the above WooCommerce hook trigger and move the project or service to ongoing status. If any payment gateway failed to run below WooCommerce order function on payment success then it will not move the project or service to ongoing
$order->payment_complete()
Most payment methods use the above function to process the order.
Any gateways that default to On Hold or Pending Payment instead of Processing will not process the order against packages update or hiring.
Like any offline payment gateway like COD, Check Payment or Bank transfer will not move the order to ongoing and when the admin will complete the order from back-end then it will move to ongoing and the freelancer balance will be updated
To make sure of this, you can try to use the Stripe Credit card payments plugin, which sends the status processing and all the functions of our theme seem to be working fine.
85. Why WooCommerce doesn't update package or bookings once PayPal is used
Why WooCommerce doesn't update package or bookings once PayPal is used
We have used WooCommerce for the packages and bookings process and have used below hooks
woocommerce_payment_complete
$order->payment_complete().
Most payment methods use the above hooks to process the order.
Any gateways that default to On Hold or Pending Payment instead of Processing will not process the order against packages update or booking.
For this, you also contact to PayPal about this situation. To make sure of this, you can try to use Stripe Credit card payments plugin, which sends the status processing and all the functions of our theme seems to be working fine.
86. Why some WooCommerce payment gateway doesn't complete the booking or hiring process
We have used WooCommerce for the packages and booking process and have used the below hooks
Hook: woocommerce_payment_complete
Function: $order->payment_complete()
Any gateways that default status goes to On Hold or Pending Payment instead of Processing will not process the order against packages update or booking.
As this is not a delivery order which needs to be processing, this should be complete the order straightforward because online bookings
In your payment gateway, this doesn't call the WooCommerce hook which we have used once the order gets completed
87. How to change currency and formatting
How to change currency
Admin can change the currency from WooCommerce settings page
88. How to enable real time chat experience with WP Guppy
How to enable real time chat experience with WP Guppy